Showing posts with label Ancient Page. Show all posts

Thursday, March 19, 2015

Heat Tool Comparison / Hero Arts Nature Challenge

Hero Arts Nature Challenge


Sometimes it's nice to upgrade a tool. I use a heat tool often in my stamping, as I enjoy heat embossing. It's also handy to speed up the drying process when using wet media. For years I've used the Ranger Heat it Craft Tool; it worked well and I didn't think about replacing it. I began seeing another heat tool used fairly often as I watched video tutorials. This one is made by Milwaukee and is the 1400 model. I noticed as I watched others do heat embossing that it seemed to go so much faster than I was used to. I finally decided to take the plunge and get one.

It came in the mail today, so I quickly got it out and decided to see if it was as good as I hoped.

Ranger Heat it Craft Tool

Milwaukee 1400


I had a scrap of an old manila file on my work  surface, and a brand new Hero Arts stamp (Paint a Flower) I'd just scored on clearance. I inked the stamp with Versamark and stamped the image in the center. I coated it with white embossing powder, then stamped and coated the same flower twice more. (Sprinkling the embossing powder on the first image makes it easier to see where to stamp again, since Versamark ink is clear.) I turned on the heat gun and was thrilled at how quickly the embossing powder melted! I also like that the nozzle is much smaller than my other heat gun, which allowed me to keep the heat focused where I wanted it. It is slightly louder than the Ranger tool, but not enough to be a nuisance. I was glad that I had glanced at the instruction booklet before using it, since it smoked a little at first. I knew that was okay, since I'd read that it might do that - just as the booklet said, it quit doing that after a few moments.

I got out some Distress Stains in Spiced Marmalade and Peeled Paint and squeezed the color onto my craft sheet. I dragged the stamped paper through the wet stain, then dried it and repeated the process. The white embossed flowers resisted the stain, and I love the way it looks.


I thought it would look a little more interesting if I cropped the image tightly around the flowers, so I trimmed the panel down and rubbed some Brushed Corduroy Distress Ink around the edges.


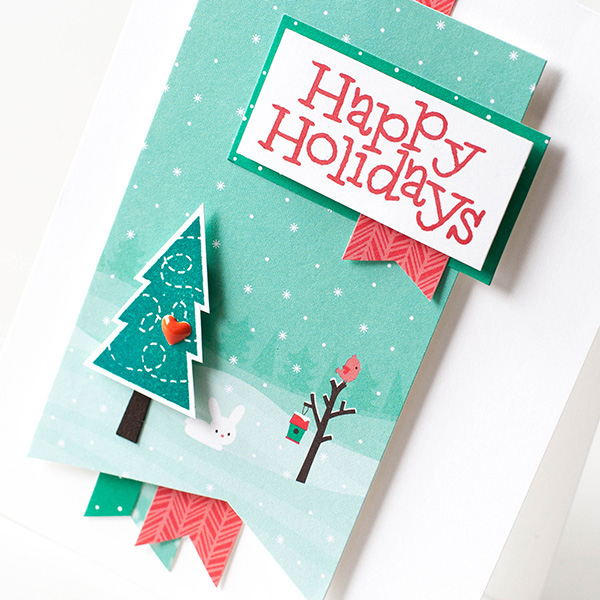
I had a scrap of the stained manila file left, so I stamped a greeting from Hero Arts Trees, Birds, & Messages, using Ancient Page Close to Cocoa and clear embossing powder. I layered my stamped pieces with some patterned paper and some textured brown paper and mounted everything on green cardstock.

Finished Card

I'm linking this to the Hero Arts Nature Challenge.

It's the last day of winter, so Happy Spring tomorrow!

Immi


Thursday, October 23, 2014

Make it Take it Challenge: October

So, I'm a little late joining this party, but I'm going to get this squeezed in by the deadline. This is a challenge from Craft Stamper Magazine. I'm not very familiar with it, but discovered it because it was mentioned on a blog I was reading. Every month they issue a new challenge - this month, participants are to use the technique of multi-color stamping. This involves using mulitple colors of ink, paint, etc. on an image.

Here's my card:


I pulled out a leaf stamp by Rubber Nature ArtStamps and started adding various colors of orange and brown Distress inks. After giving it a light misting of water, I stamped that on a cardstock panel. Then I stamped it again on another, lightweight piece of paper and cut it out to make a mask. I put the mask over my leaf, and inked up an old favorite script stamp from Stampin' Up! in various shades of green Distress inks. I stamped the script on top of the masked leaf, and then removed the mask. This left the leaf image untouched, with the script all around it.

So far, so good. I trimmed the panel down a little, and mounted it to some dark brown paper which was product packaging I'd saved. I pulled out some multi-hued thread and wrapped it around the top of the panel several times, securing it to the back with tape.

Next I pulled out Altenew's Label Love set and chose "thank you". I tried several brown inks before settling on a very old Ancient Page ink in Close to Cocoa (Stampin' Up!). I poured clear embossing powder over that and heat set it. I trimmed it close to the stamped image, leaving some of the white around it as a frame. I tried that on the card front, but I felt that it needed something dark behind it to provide sufficient contrast to the panel behind it. Brown didn't seem to be the right choice, but I thought a rust color would work. I inked up some paper using Distress Ink in Rusty Hinge, creating my own colored paper. I adhered the sentiment to this and trimmed it, leaving a thin edge of color showing. This was added, and that was that - all done!

Happy crafting!
Immi

Monday, October 20, 2014

Challenge: Anything Goes

Hi! I'm back with another Simon Says Stamp Monday challenge. My card was inspired by a recent post from Simon Says Stamp. Here's the original by Shari Carroll:

Shari Nov card kit D1

I really liked the layered paper banners, and the offset cut of the largest paper panel. I pulled out some papers from a 6 x 6 pad from My Mind's Eye. The nice thing about paper collections like this is that all the papers are designed to coordinate with one another; this simplifies things when using multiple prints together.

The hot air balloon image is also from My Mind's Eye, while the "hi" sentiment is from Simon Says Stamp. The red ink is from a REALLY OLD ink pad from a collaboration between Stampin' Up! and Ancient Page. (Some of my supplies are getting pretty ancient.)

This was pretty quick to put together. I did fussy cut the sentiment and balloon (not my favorite thing, but I like the way it looks), and ink the edges of the banner behind the sentiment. Just for fun I mounted the sentiment and balloon using foam tape to give some dimension to an otherwise flat card. Other than that it was just arranging and adhering layers of paper. I also used a 1/2" corner rounder from Crop-A-Dile on the upper right corner.