Showing posts with label Simon Says Stamp Monday Challenge. Show all posts

Monday, July 27, 2015

Challenge: No Ordinary Paper

The Monday challenge this week on Simon Says Stamp is to use some type of paper other than regular cardstock. There are several wonderful examples of work to provide some inspiration.

I've been experimenting lately with Bristol. I bought a pad on sale and have tried some stamping techniques on it. It is very smooth, has a nice weight, and takes ink quite well (much better than some of the cheaper cardstock I've tried). Here is one of the cards I did:


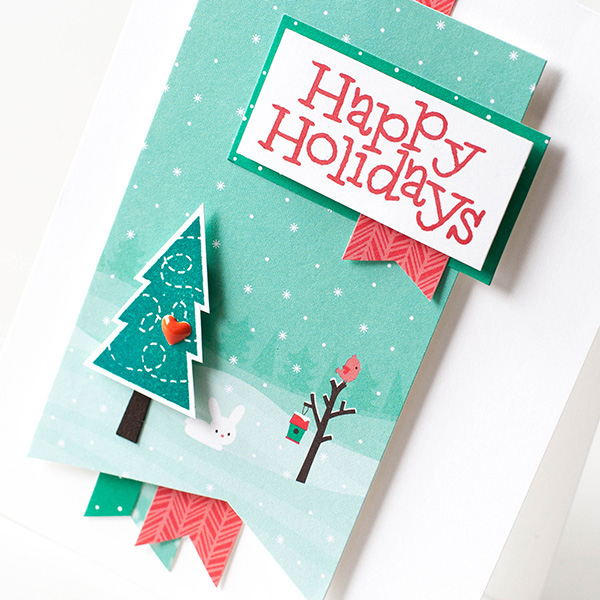
I started with a piece of Bristol, cut to 4.25" x 5.5". I blended Antique Linen Distress ink over the surface with a blending tool. Next, I stamped the tree (Xmas Constellation by Penny Black) with Doll Pink ink from Simon Says Stamp. The sentiment is from Winter Wonderland from Winnie & Walter; it is stamped with Potting Soil Archival ink and heat embossed with clear embossing powder.

The splotches on the card front are made by mixing Broken China Distress ink, water, and a little Perfect Pearls pigment powder. This mixture is picked up with a small brush and flicked over the card front. I also did a little mixture of water and Perfect Pearls with no additional color and flicked that over the surface as well. Hopefully it gives the suggestion of snow, but maybe it just looks messy!!

I trimmed the Bristol panel down slightly and mounted it to a dark brown card base. The two thin colored strips on the right were made by rubbing ink directly from the ink pad onto the surface of some scrap Bristol - I used Broken China & Doll Pink. Once the ink had dried, I cut the strips and glued them down. Since the blue strip was slightly raised due to being layered over the Bristol, I cut two tiny pieces of cardstock to glue underneath the ends to keep everything even.

I hope your week is off to a good start!

Immi


Monday, February 16, 2015

Thanks!

Today I'm enjoying a day off from work. I recently started a new job, and I'm missing my craft time! I decided to make a "thank you" card today for a co-worker of mine. She made a little sign with my name for my work space as a welcoming gesture - so nice of her! I thought it would be fun to use the Simon Says Stamp Monday challenge, A Piece of Paradise, to jump start my project.


I started with a piece of watercolor paper, cut to A2 size. I sprayed it with water, then had fun with several spray inks (Glimmer Mist & October Afternoon), letting the colors run and blend together. After drying it with my heat gun, I took a Tim Holtz stencil (Burlap), and spread Ranger's Texture Paste randomly through the stencil. I let that air dry for a little bit, then finished the drying with the heat tool. I used some Mini Distress inks and blending tools to add some color to the top of the texture paste. Next I die cut watercolor paper into flowers & leaves using Tattered Florals and Tattered Leaves dies from Sizzix. I sprayed those with inks as well, but they seemed a little blah. I added some interest to them by using various stencils & stamps. For the leaves, I used the Typewriter Background stamp from My Favorite Things and Mowed Lawn Distress Ink. For the purple flower layer, I used Tim Holtz' stencil, Dot Fade and Seedless Preserves Distress Ink. For the yellow flower layer, I stamped with Dandelion Archival Ink and a Penny Black stamp called Penmanship. The blue flower layer is stamped with Peacock Feathers Distress Ink and a mini script stamp from Prima. I also edged the leaves with a Black Soot Distress Marker to help them stand out more from the background. I glued the leaves & flower down with Perfect Paper adhesive. The sentiment is from Stampin' Up! (Many Thanks). That was stamped on a scrap of watercolor paper with Versafine Black Onyx, covered with clear embossing powder, and heated. I trimmed closely around it and sprayed it with Sea Glass Glimmer Mist. Then I mounted it on a scrap of purple cardstock, notched on the one edge. I tucked the opposite edge under the leaves when I glued it down. The finished panel was mounted on purple cardstock, using Tombow's Extreme Adhesive. For one last touch, I glued a clear gemstone from my stash as a center for the flower.

That's it for today - happy Monday to you all!

Immi


Wednesday, November 12, 2014

Getting in the Holiday Mood

I have a couple of projects to share for this week's Monday challenge from Simon Says Stamp.

First is a card I made, inspired by this card.


I started with a kraft cardstock panel. I stamped the sentiment first to be sure that the snowflakes would fit around it. I combined snowflakes from multiple sets (Stampin' Up! and Inkadinkado) so that each one would be different. I used a silver pigment ink and covered that with silver embossing powder. After heat setting, I wanted to use some kind of thread or ribbon to make the snowflakes look like hanging ornaments. I remembered that I had some thin silver cord, so I tried that. I put down tiny dots of Glossy Accents to hold the ornament strings in place, then tied teeny little bows and glued them above each snowflake. I put a heavy book on top until everything dried. Then I wrapped the cord to the back of the panel and taped it down. The stamped panel was mounted onto a navy card base. I was surprised how quickly this came together. In retrospect, though, I don't know if I'd use the silver with kraft again. I'm not sure there's enough contrast. Live and learn, I guess.

Next is an ornament:


To make this, I cut a scalloped circle from watercolor paper using a die set from Spellbinders. The stamp I used is an old one from Stampin' Up! that I've had for many years. I used Versafine Black Onyx ink and embossed it with clear embossing powder. To color the image, I used Distress Inks diluted with water and some Stampin' Up! markers in a few spots.

I cut three more scallops and glued them all together, using a book to weight it down until dry. I decided to run a Versamark marker around the edges and dip them in silver embossing powder. I really like the way that turned out. Then I used a bookbinding tool to punch a small hole in the top and used some of that thin silver cord to make a hanging loop.

That's it for now. I hope your week is going well!

Immi


Monday, October 20, 2014

Challenge: Anything Goes

Hi! I'm back with another Simon Says Stamp Monday challenge. My card was inspired by a recent post from Simon Says Stamp. Here's the original by Shari Carroll:

Shari Nov card kit D1

I really liked the layered paper banners, and the offset cut of the largest paper panel. I pulled out some papers from a 6 x 6 pad from My Mind's Eye. The nice thing about paper collections like this is that all the papers are designed to coordinate with one another; this simplifies things when using multiple prints together.

The hot air balloon image is also from My Mind's Eye, while the "hi" sentiment is from Simon Says Stamp. The red ink is from a REALLY OLD ink pad from a collaboration between Stampin' Up! and Ancient Page. (Some of my supplies are getting pretty ancient.)

This was pretty quick to put together. I did fussy cut the sentiment and balloon (not my favorite thing, but I like the way it looks), and ink the edges of the banner behind the sentiment. Just for fun I mounted the sentiment and balloon using foam tape to give some dimension to an otherwise flat card. Other than that it was just arranging and adhering layers of paper. I also used a 1/2" corner rounder from Crop-A-Dile on the upper right corner.


Tuesday, October 14, 2014

Challenge: O is for...

This week's Simon Says Stamp Monday Challenge is to be inspired by the letter "O". I always enjoy seeing the different interpretations that the blog design team shows us to get things going.

I chose to let "O" represent the color orange. It's a nice fall color, although the card I made doesn't have an autumn feeling at all. Here it is:


This was a fun technique-driven card. I made the background using a stencil and Distress Ink. The sentiment panel was made by smudging various Distress Inks on an acrylic block that had gridlines on it. After applying the inks, it was sprayed with water and pressed onto some watercolor paper. I really like the colorful background it created, and it was super easy. The sentiment was  stamped with Versafine black ink and layered onto the orange background. The card base is a light green cardstock.
This card went in a box for Operation Write Home.

I hope you can do something fun and creative today!

Immi

Monday, September 15, 2014

Challenge: Rock the Techniques

Today's challenge on Simon Says Stamp is to feature a project using the technique of your choice. I've decided to post a card I made using watercolors and liquid frisket. If you aren't familiar with it, frisket is used to mask off areas in order to retain the white paper before doing any watercolor painting. I got this idea from an online class called Watercolor for Cardmakers. I haven't done too many of the lessons yet, but I'm enjoying what I'm learning and having fun playing with paper and watercolor.

Here's my card:

I stamped the "thanks" greeting (Stampin' Up!) with black ink and made sure it was completely dry. I painted over it with frisket. After the frisket was dry, I then blobbed on (highly technical term) some watercolors. I added a few splatters and let everything dry. When I peeled off the frisket, the stamped image was still nice and clean underneath. Simple and fun. I mounted the watercolor paper on a pink card base and that was that!

Happy crafting!
Immi

Sunday, July 20, 2014

Challenge: About A Face

This week's Monday challenge on the Simon Says Stamp blog is called "About a Face". The challenge is to come up with a project that features a face - a clock face, a person's face - the interpretation is open. 

After seeing an inspiring video tutorial on coloring with Distress Inks and Cut & Dry Nibs, I decided to give it a try. I pulled out a collage-style stamp I haven't used in a looong time. It's called "Small Rose Collage" by Paper Inspirations. The video I had watched suggested using Specialty Stamping Paper by Ranger which I didn't have. I thought the technique might work on some glossy paper I had in my stash, so that's what I used.

I stamped the image using black Archival Ink, which will not bleed when touched by water. This is important for the coloring, since the Distress Inks would make other black dye inks run. After heat setting, I followed the instructions on the video and used the nib to apply ink to the stamped image. I heat set after each color to prevent smearing. After all the coloring was done, I rubbed some darker Distress Ink on the edges to give it some definition.

I decided to use the image to make a card and went with a top-folding style. I rarely do this type of fold, but it's very popular right now so I  hopped on the bandwagon. I trimmed my stamped image and mounted it on a pale pink cardstock and wrapped some black & gold ribbon around the bottom. I mounted this panel onto a black card base. Normally I would stamp a sentiment for the card front, but I chose to leave it off this time. I think this card would work for any occasion, or just to send a note.

Here's my finished card:


Happy crafting!

Immi

Tuesday, July 1, 2014

Challenge: W is for White!

This week, Simon Says Stamp issued a challenge to use the color white. I thought it would be interesting to stamp and emboss in white on kraft colored cardstock. Here's how it turned out:


Kraft cardstock is great because it lends itself to any color combination you like. It can have a masculine or feminine feel, depending on what you do with it. I chose to use a flower flourish stamp with rather bold lines. I stamped with Ranger's white pigment ink, and heat embossed with white powder. I've learned the hard way that it's worth it to take the time to prep the paper before stamping or adding the embossing powder. Otherwise, little specks of embossing powder end  up where you don't want them and it's a pain to try to brush them off! I use a powder applicator by EK Success, but any brand will do.I stamped the sentiment on a separate piece of paper using ColorBox Warm Red chalk ink, and heat embossed that with a red powder. I ran some red ink along the edges after notching the ends. I trimmed the kraft piece down to fit on a white speckled card base, allowing the white to serve as a frame.

This was a quick and easy project, and I'm happy with the way it turned out. I hope the recipient likes it!

Immi