Friday, December 12, 2014

White Stamping

I'm participating in the Craft Stamper Magazine's Make It Take It Challenge for December. The requirement is to stamp in white. I thought it would be fun to do a "chalkboard" card. This is a fun technique that's been around for a while, although I've just recently tried it. I always seem to get on the trend bandwagon late!

Here's my card:

"Chalkboard" Santa


I used a stamp set I've had for a long time from Stampin' Up! called "Christmas is Here". Before stamping, I prepped my cardstock (plain smooth black) with antistatic powder to help prevent embossing powder from getting all over. I stamped the image and saying using Hero Art's Unicorn White pigment ink. Then I poured white embossing powder over it and heat set it. After it cooled a little, I had some fun coloring the design with colored pencils. Then I used a foam pad dabbed with the white pigment ink to smear "chalk" over the surface of the stamped panel. As a final touch, I used a ruler to draw lines with a white pencil around the perimeter. I mounted the panel to some festive striped paper and then mounted it to a top-folding white card base.

It's been fun to do some experimenting with this technique lately. It's quick and easy  - I did quite a few gift tags for Christmas presents, too, with smaller and simpler designs.

I hope you are enjoying this special time of year!

Immi

Monday, December 8, 2014

Christmas Decorating


Mantel in the Family Room

Lately most of my creative energies have gone into decorating our home for Christmas. It's a lot of work, but I really enjoy the finished product! I usually get going right after Thanksgiving and it takes me 2-3 days. Here are some glimpses of Christmas around here...

Baker's Rack 

Vintage Dresser in the Dining Room

Coffee Table (the Fostoria bowls belonged to my grandparents)


Kitchen (the "tree" is my mom's old jelly strainer)

Top of Piano in Living Room


(Mostly) Vintage Ornaments

I hope you enjoyed this little tour!

Immi

ps - Can you guess what I like to collect???


Monday, November 24, 2014

Christmas Tag Card

Although I usually don't make my own Christmas cards, it's easy to find inspiration this time of year. I have some new stamps that I won in a drawing (Winter Wonderland by Winnie & Walter) and wanted to try them out:


I started with a plain manila tag, colored with Broken China distress ink and a blending tool. I inked the tree stamp with Peeled Paint Distress Ink and spritzed it lightly with water before stamping over my blue background. After heat setting, I mixed up a little white acrylic paint with water and flicked it over the tag with a paintbrush to create a snowy effect. 

The stag was stamped with Ranger's Potting Soil Archival Ink and coated with clear embossing powder while wet. After heat setting, I poured on additional embossing powder and heat set it again for a nice, smooth look.

I wanted to layer some papers behind the tag, so I chose a red plaid and cut it into a tag shape. The white paper with green dots is a Project Life journal tag which came printed with grid lines. I stamped the dots using Penny Black's Dots in Space stamp and Peeled Paint ink, then cut it into a tag shape. After punching holes in my homemade tags, I tied them behind my stamped tag using some dark red sheer ribbon.

The white panel behind the tags started as plain white cardstock. I used Ranger's Texture Paste through a Prima chevron stencil, then sprinkled some iridescent embossing powder over that. I let it sit for a few minutes and then heat set it.

The sentiment is inked with Potting Soil and embossed with clear powder. I colored the white cardstock with Aged Mahogany Distress Ink and a blending tool, and cut the banner shape by hand.

Everything was adhered to a dark brown cardstock base, cut to be a top folding card.

I'm linking this card up to two challenges: Winnie & Walter Playdate #4 and Muse Challenge #95. I pulled inspiration from both of these challenges to make my card. My colors I chose from the Winnie & Walter image:

w&w_playdate4_oct2014
Winnie & Walter Playdate #4

The idea of layered tags came from the Muse image:

Muse Challenge #95

I hope you have a great time this week, enjoying Thanksgiving with family and friends!

Immi

Friday, November 14, 2014

Muse #93

I had fun this week taking inspiration from the card posted on the Muse blog.


I took away a couple of things from the original card: the simple shape of the tree and the "jewels" adorning it. 

Using Strathmore Bristol, I inked the paper with green Distress Inks, flicking some water droplets on top after heat setting it. I trimmed out my tree shape and set it aside.

For the background, I wanted to try to imitate a night sky. There are several good tutorials out there, and after watching a couple, I pulled out three shades of blue Distress Inks. These blend really nicely on the smooth surface of the Bristol paper. After heat setting, I decided to try to deepen the colors and was really amazed at how much more intense I was able to make it. I love the way that Distress Inks blend with each other!

I used a couple of different products to imitate the starry sky - the effect I like the most was simply dotting on Iridescent Medium by Liquitex.

I glued down some sequins onto my tree and was happy to find that I had a star shaped sequin for the tree top. The tree trunk was cut from some brown paper in my scrap drawer. Now that I think about it, the only stamping on this card is on the sentiment banner. I don't know the name of the set that the word came from, but the little red stars are from a Hero Arts set called "Birthday Messages". I used Stampin' Up! ink in Real Red for the stars and also to run around the edge of the banner.

Here is the original inspiration card:

Muse #93

I hope you have a great weekend!

Immi

Wednesday, November 12, 2014

Getting in the Holiday Mood

I have a couple of projects to share for this week's Monday challenge from Simon Says Stamp.

First is a card I made, inspired by this card.


I started with a kraft cardstock panel. I stamped the sentiment first to be sure that the snowflakes would fit around it. I combined snowflakes from multiple sets (Stampin' Up! and Inkadinkado) so that each one would be different. I used a silver pigment ink and covered that with silver embossing powder. After heat setting, I wanted to use some kind of thread or ribbon to make the snowflakes look like hanging ornaments. I remembered that I had some thin silver cord, so I tried that. I put down tiny dots of Glossy Accents to hold the ornament strings in place, then tied teeny little bows and glued them above each snowflake. I put a heavy book on top until everything dried. Then I wrapped the cord to the back of the panel and taped it down. The stamped panel was mounted onto a navy card base. I was surprised how quickly this came together. In retrospect, though, I don't know if I'd use the silver with kraft again. I'm not sure there's enough contrast. Live and learn, I guess.

Next is an ornament:


To make this, I cut a scalloped circle from watercolor paper using a die set from Spellbinders. The stamp I used is an old one from Stampin' Up! that I've had for many years. I used Versafine Black Onyx ink and embossed it with clear embossing powder. To color the image, I used Distress Inks diluted with water and some Stampin' Up! markers in a few spots.

I cut three more scallops and glued them all together, using a book to weight it down until dry. I decided to run a Versamark marker around the edges and dip them in silver embossing powder. I really like the way that turned out. Then I used a bookbinding tool to punch a small hole in the top and used some of that thin silver cord to make a hanging loop.

That's it for now. I hope your week is going well!

Immi


Tuesday, November 11, 2014

Take It, Make It Challenge : November

The November Make It Take It challenge from Craft Stamper Magazine just about had me stumped. The challenge is to use non-Christmas themed stamps to create a Christmas or holiday card. I enjoyed seeing the examples from the Design Team, but I was drawing a complete blank. And then...it came to me! Alphabet stamps in the shape of a tree! Now I was getting excited to see if I could make it work.


I knew I would need to use a clear stamp set so that I could see exactly where each stamp was being placed. I pulled out Typewriter Alphabet by Stampendous which I thought would be about the right size. I tried at first to stamp each letter individually, but I quickly saw that it would be very uneven and messy looking. I decided I would use a stamp press, and tried laying the stamps out on a piece of paper but they kept getting bumped out of position. (Insert sounds of frustration.)

I finally figured out that I needed to arrange them directly on the stamp press so that they would stay put until I had them all in position. Ahh! That's much better! I stamped them on my paper and then used some low tack tape to mask off a triangle around the "tree". I heat set it to be sure it was dry and began blending some Distress Ink in Evergreen Bough over the letters. To my dismay, the letters began smudging. Blech!

So, determined to make it happen, I turned the paper over and taped off my triangle area again. I blended the Distress Ink over it and decided to flick a little water over the surface to create some lighter spots. After drying the paper, I inked up the letters again and stamped - much better this time!

Next I took a small stamp that looks like an asterisk and stamped in Stampin' Up! Real Red randomly over the tree. I cut it out and brushed the edges with some more Evergreen Bough and a little Vintage Photo.

Next up, the background. I took another sheet of paper - by  the way, I used Strathmore Bristol for this project - and inked the entire thing with Tumbled Glass Distress Ink. After heat setting, I used the little asterisk along with a couple of others to stamp "snowflakes" with Versamark. I poured some sparkly embossing powder over them and heat set again. It's hard to see in the photo, but the snowflakes have some nice sparkle to them.

I cut a scrap of white to make a hill for the bottom of the card, along with a scrap of brown for a tree trunk. I stitched the hill down and used adhesive for the tree and trunk. I had a little silver star in my stash that I glued above the tree with Glossy Accents so it won't budge.

Finally, I colored some scrap white cardstock with Festive Berries Distress Ink and stamped the sentiment which is from a new set called Winter Wonderland from Walter & Winnie. The sentiment comes as a single line, but since it's a clear stamp I was able to cut it apart and stamp it as a two-line sentiment. That fit my card better. I cut the strip of paper in a banner shape and adhered it down to the background panel. The entire panel was then adhered to a top-folding white card.

I'm happy that I was finally able to come up with something for this month's challenge. Hope you enjoyed  it!

Immi

Thursday, November 6, 2014

Simon Says Stamp Flickr Challenge #5

I had some time this week to see what was going on with the Simon Says Stamp Flickr group. The current challenge is to use embossing - something that's lots of fun. I used two types of embossing on this card - dry embossing with a folder and heat embossing. The main rule with this group is that all projects must incorporate products designed by Simon Says Stamp. I have a few of their sets, so I got busy.


I started with a white cardstock panel that I'd used to practice blending Distress inks. Hopefully you can see that the color moves from dark to light. That was done by blending three colors of Distress inks (Faded Jeans, Broken China, and Tumbled Glass) using the Distress blending tool. It took some time and more than one application, but I finally got a nice smooth transition. I ran that through my Big Shot with the Distressed Frame embossing folder by Sizzix. Then I added some Pumice Stone and Peacock Feather Distress inks around the edges to bring out the raised, embossed area.

Peeking out from behind the heart is a white rub-on from Me & My Big Ideas. It was a bit of a bear to get rubbed on properly, but I finally managed.

The heart is from SSS Music 2 My Ears. I stamped with Versafine Black Onyx and embossed with clear embossing powder. I used some Dried Marigold Distress ink around the edges, and added foam tape to the back.

The flowered paper is from a 6 x 6 pad called Vintage Bliss Paper by Simple Stories. I cut a small strip and stitched it down to the blue panel. 

The gray banner at the bottom was originally a white strip of paper that I colored by pressing Simon Says Stamp Fog ink onto it. I stamped the sentiment, pulling stamps from a couple of SSS sets - Big You and Hello, You. I darkened the edge with Faded Jeans and added three crystal gems.

Finally I was ready to pull everything together. I wrapped some peach silk ribbon a couple of times around my hand to form loops, and taped that down to the blue panel. The heart was placed on top and the gray banner at the bottom. The completed blue panel was adhered to a white card base.

Sometimes when I look at a stamp set I have no idea what to do with it - I just draw a blank. That was the case with the Music 2 My Ears set. I wanted to use it, but nothing was coming to me. I did a Google image search and found a lovely card that got me going. Here it is:

Inspiration Image

If you'd like to see the original post, please click on the photo's caption. It should take you there.

Happy crafting!

Immi


Wednesday, November 5, 2014

Muse Challenge #92

Hello and Happy Wednesday to you! I'm participating in another challenge today from Muse. Here's my interpretation:


I was inspired by several things in the inspiration image (see below): the blue & green dots, the flowers, and the vellum sentiment strip.

For my card, I chose a flower stamp from Hero Arts. I used Hero Arts black ink and stamped several times on textured white paper. The paper is actually the back side of the cover to a pad of el cheapo watercolor paper. I used some of my trusty Stampin' Up! markers to color in parts of the flowers. The blue dots were made with another Hero Arts stamp and Brilliance Sky Blue ink.

I trimmed this panel down and added a thin strip of green cardstock to the right hand side, then set it aside while I worked on the sentiment strip.

I cut a piece of vellum and used Versafine Black to stamp the sentiment from Altenew. I really like the larger sentiments that are available these days and would like to add more of them to my collection. After stamping, I heat set it and then stamped again in Versamark. I poured clear embossing powder over that and heat set again. I was interested to see that the Versamark lightened the black ink so that my sentiment was now stamped in gray. That's not what I had intended, but I went with it anyway.

I wrapped the vellum strip around my flower stamped panel and taped it down to the back. Then I adhered the panel to a dark pink card base.


Here's the inspiration card:

Muse #92

Thanks for reading - I hope you enjoyed this! Till next time,

Immi


Monday, November 3, 2014

Challenge: Anything Goes

Last week, the Wednesday Simon Says Stamp challenge was the wide open theme of "Anything Goes". I had just made a card  that I thought would work for this challenge, but today is the first chance I've had to post it.


This came about as a result of an experiment. I had seen a technique that I thought looked interesting and wanted to give it a try.

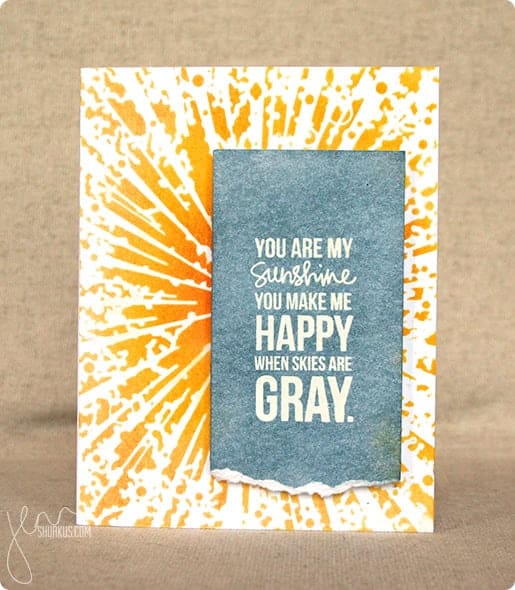
I took some off-white cardstock and, using a brayer, layered Distress Ink in Mustard Seed and Barn Door. I then spread on some acrylic medium by Golden called Coarse Garnet Gel. If you look closely, you can see bumpy spots, which are the grit embedded  in this gel. The grit is a dark red color, while the body of the medium is clear. I had no idea how this would turn out, but I thought it was very interesting. The colors of the inks stayed true and were even intensified, and the grit in the gel added texture. I left it to dry overnight - the next morning it was dry but the cardstock was rather flexible. I wasn't sure what to do with it at that point, but I decided to make a card background with it. I trimmed a little off the edges and adhered it to a green card base.

The pear stamp is an oldie from A Stamp in the Hand. It's a very solid image with little detail, so it works well for blending colors. I used several Distress Ink colors in the mini pads and then spritzed it with water. I stamped onto some watercolor paper and added a few splotches of color with watered down ink.

I trimmed it pretty close, tearing the bottom edge of the panel and mounted it onto some dark brown paper. I added some foam adhesive (3M) to the back and set it aside for a moment. I cut a length of twine and looped it around my fingers, then placed it on the card front with the foam mounted pear panel on top. The foam adhesive holds the twine in place.

The "happy birthday" sentiment is from Altenew's Label Love (I'm using that set a lot lately!). I've discovered that these stamps work best for me if I stamp on a surface with a little give, like a pad of paper. I used a teeny bit of foam adhesive on the far right side of the sentiment strip to bring it up to the level of the pear panel. Otherwise it would have been hanging in mid-air and probably would have gotten bent out of shape.

I thought the card still needed a little something, so I found a dark brown button and threaded it with a little gold metallic thread, then glued it on with some Glossy Accents.


This next card has nothing to do with the challenge, but it's so similar I thought I'd include it. The background was made with a checkerboard stamp, inked with Distress Ink and misted with water. It was stamped on some watercolor paper and trimmed a little smaller than the card base.

The pear was done exactly the same as the previous card and also mounted on dark brown paper. I wrapped some twine around the checkerboard panel, and added a die cut "p" just for fun.

That's it for today. I hope your week is off to a good start!

Immi

Monday, October 27, 2014

Challenge: Get Crafty & Use Kraft

Here is my submission to the Wednesday Simon Says Stamp challenge - Get Crafty & Use Kraft. I love the look of kraft cardstock so this was a fun challenge.


I used one of my favorite flower stamps from Stampendous, stamping in Versamark and heat embossing with white. I colored in the flowers using Inktense pencils and a wet brush, which went very quickly. The embossing makes it easy to "stay in the lines".

The sentiment is from Altnew's Super Script 2. I stamped in black ink and trimmed it closely. I brushed on clear Wink of Stella and added Glossy Accents on top, then set it aside to dry. 

Meanwhile, I cut a piece of lace edging and taped it down to the back of the kraft panel. I stitched around the entire panel using my sewing machine, then adhered a thin strip of green ribbon at the bottom. This panel was attached to a pink card base, then the sentiment was glued on top of that.

I hope your week is off to a good start! Happy crafting!
Immi


Thursday, October 23, 2014

Make it Take it Challenge: October

So, I'm a little late joining this party, but I'm going to get this squeezed in by the deadline. This is a challenge from Craft Stamper Magazine. I'm not very familiar with it, but discovered it because it was mentioned on a blog I was reading. Every month they issue a new challenge - this month, participants are to use the technique of multi-color stamping. This involves using mulitple colors of ink, paint, etc. on an image.

Here's my card:


I pulled out a leaf stamp by Rubber Nature ArtStamps and started adding various colors of orange and brown Distress inks. After giving it a light misting of water, I stamped that on a cardstock panel. Then I stamped it again on another, lightweight piece of paper and cut it out to make a mask. I put the mask over my leaf, and inked up an old favorite script stamp from Stampin' Up! in various shades of green Distress inks. I stamped the script on top of the masked leaf, and then removed the mask. This left the leaf image untouched, with the script all around it.

So far, so good. I trimmed the panel down a little, and mounted it to some dark brown paper which was product packaging I'd saved. I pulled out some multi-hued thread and wrapped it around the top of the panel several times, securing it to the back with tape.

Next I pulled out Altenew's Label Love set and chose "thank you". I tried several brown inks before settling on a very old Ancient Page ink in Close to Cocoa (Stampin' Up!). I poured clear embossing powder over that and heat set it. I trimmed it close to the stamped image, leaving some of the white around it as a frame. I tried that on the card front, but I felt that it needed something dark behind it to provide sufficient contrast to the panel behind it. Brown didn't seem to be the right choice, but I thought a rust color would work. I inked up some paper using Distress Ink in Rusty Hinge, creating my own colored paper. I adhered the sentiment to this and trimmed it, leaving a thin edge of color showing. This was added, and that was that - all done!

Happy crafting!
Immi

Muse Challenge #90

I stumbled a cross a new challenge blog this week and decided to participate. The blog is called Muse: A Cardmaking Club. I liked the bright colors of the challenge card as well as the design. Here it is:


I immediately thought of a Tim Holtz stencil I've got called Rays. I got out a piece of watercolor paper and taped it down to my craft sheet so it wouldn't move around. I taped the stencil on top (painter's tape works well) and also used some strips of tape to mask off adjacent rays so that the colors would stay where I intended them to go. I did all the yellow first, using Mustard Seed Distress Ink. Then for the red rays I used Barn Red Distress Ink. 

The stencil is a narrow one, and it didn't work to use it to duplicate what you see in the photo above. I ended up cutting the paper in half lengthwise after stenciling it. I paired it with a strip of bright red cardstock and adhered both pieces to a card base. To cover the spot in the middle where the pieces join, I cut a thin strip of black cardstock and glued that down.

I found a small black tag in my stash, and decided to use that with a word from a new die cut set I just bought - it's by Tim Holtz and has lots of Christmasy words. I die cut the word "wishes" four times from bright blue cardstock and glued the layers to each other to make it thicker. I coated the word with my clear Wink of Stella pen and added Glossy Accents on top of that.

Next I got out the Label Love set by Altenew and stamped "Just for You" in Stampin' Up turquoise ink. I stamped the same thing in Versamark on top of that and added  clear embossing powder. After heat setting the powder, I cut out the word strip and mounted in on some foam tape.

To finish it up, I found a red heart-shaped button that I added to the tag along with some blue twine (thanks to Target's Dollar Spot!).

Here's my take on this challenge:


I'm actually glad that I wasn't able to stencil the pattern on both sides of the watercolor panel. I like the way it turned out. I wish you could see the shine and sparkle on "wishes" - it looks great!

Till next time,

Immi

Monday, October 20, 2014

Challenge: Anything Goes

Hi! I'm back with another Simon Says Stamp Monday challenge. My card was inspired by a recent post from Simon Says Stamp. Here's the original by Shari Carroll:

Shari Nov card kit D1

I really liked the layered paper banners, and the offset cut of the largest paper panel. I pulled out some papers from a 6 x 6 pad from My Mind's Eye. The nice thing about paper collections like this is that all the papers are designed to coordinate with one another; this simplifies things when using multiple prints together.

The hot air balloon image is also from My Mind's Eye, while the "hi" sentiment is from Simon Says Stamp. The red ink is from a REALLY OLD ink pad from a collaboration between Stampin' Up! and Ancient Page. (Some of my supplies are getting pretty ancient.)

This was pretty quick to put together. I did fussy cut the sentiment and balloon (not my favorite thing, but I like the way it looks), and ink the edges of the banner behind the sentiment. Just for fun I mounted the sentiment and balloon using foam tape to give some dimension to an otherwise flat card. Other than that it was just arranging and adhering layers of paper. I also used a 1/2" corner rounder from Crop-A-Dile on the upper right corner.


Friday, October 17, 2014

More Fall Decorating

As promised, here are the rest of the photos I took after finishing decorating for fall.


This is the coffee table in the living room. The pumpkin and horn of plenty were gifts from one of my sisters years ago. I love to get them out every year. They were made by Frankoma, an Oklahoma pottery. They are unfinished on the bottom, so to protect the table I made a runner. I found some Osnaburg at the fabric store. This is really a great fabric for anyone who likes the look of linen. Osnaburg has that look, but is made from cotton. It's really inexpensive and very easy to work with. It also irons up much easier than linen! I cut a length of fabric and stitched around all four sides. I pulled out the threads to make a fringe. Then, just for fun, I did a running stitch with orange embroidery floss around the edges. It really didn't take all that long from start to finish.


The wooden chair is from an old elementary school in Minnesota. My children attended there and I worked as a classroom assistant. It was quite old (100 years) by the time my children were there, and the decision was finally made to tear it down. Another old school was also torn down, and one new one built to replace both. The principal allowed me to take this old chair as a memento, which I thought was so nice. I love having a piece of Roosevelt Elementary!

The close-up photo shows a little display I made using some old books. Don't worry - the books were falling apart and probably ready for the recycle bin anyway. I tore off the covers, and tied them all together with a strip of burlap and some twine. I stuffed a torn piece of cheesecloth behind the twine bow and glued on a crocheted flower I had in my stash. I stamped the letters using brown ink. I could spend hours fooling around with this kind of stuff!

That wraps it up for my fall decorating. I hope you enjoyed it - I know I did! I love sitting down in a chair and seeing things all decked out.

Till next time,
Immi


Thursday, October 16, 2014

Unity Stamp Challenge

I have recently been experimenting with some of the stamps from Unity Stamp Company. Their stamps are all made in Minnesota. The prices on sale are really great, and shipping is quite reasonable. Each month, on their blog, a new challenge is posted. Participants have the choice of basing their inspiration on a sketch and/or a color scheme.


I love the look of vintage ornaments, so the photo really caught my eye. I decided to try to incorporate the colors and the card sketch. Here's the result:


I started with an off-white cardstock that I colored with Distress Ink - Old Paper, using a blending tool. Then I inked up a background stamp - Thin Stripes from Impression Obsession, using Distress Ink in Spun Sugar. The pink panels are from a 6 x 6 paper pad by Colorbok that I found at Walmart. 

The sentiment is from Unity Stamp's October 2014 Sentiment Kit. I stamped it on a plain old manila shipping tag using Ranger's black Archival ink. The tag was colored with Distress Ink Peacock Feathers, with Vintage Photo around the edges. I spread a crackle medium over the entire tag and let it dry. I love the cool crackled effect!

The thread is some heavy cotton thread that I colored using Distress Inks in Picked Raspberry and Vintage Photo. I smooshed some ink on my craft sheet and spritzed it with water. Wearing a glove to prevent stained fingers, I rubbed the thread into the ink until it was colored, then dried it with a heat tool. I wrapped both colors around the bottom of the tag, and also made a bow at the top.

Till next time,

Immi

Wednesday, October 15, 2014

Ready for Fall?

It takes much longer here in Oklahoma than it did in Minnesota for it to feel like fall - I know, completely obvious, right? Consequently, I have a hard time getting in the mood to decorate for fall when it's still hot all the way through September. Now that October has arrived (yikes, we're halfway through already!), I finally got out my fall goodies and got busy.

I didn't even bother will fall decorating last year, since we were still settling in after our move. This year, I was determined  to enjoy the process as much as possible. Here are some photos:


Most of what you see I had already. I did buy some additional fake pumpkins, the window frame, the small ceramic owl, and the mirror. It took several attempts to get things arranged to my satisfaction. It would probably be rather funny to watch - I'll try something and then I have to walk away. I'll turn around and look at it to see if anything seems jarring or out of place. Maybe I'll have to do some tweaking, or I might pull it all down and start again.


The only new things here are the little green ceramic pumpkin and a couple of fake pumpkins and gourds - the rest I already had. As you can see, I often use vintage books throughout my home to display things. I love the worn color and texture they add. I also have several thrift store pieces of tarnished silver. It's a good think I like the tarnish, since it saves me all that polishing!

I also decided to make a new curtain for the back door to replace the bright colorful one I had there. I think this will look good all through the winter months.


I found this fabric on sale and really liked it. The blue does a nice job of picking up the color we've painted the walls. Since it's just a panel, it was so quick and easy, although I did line it with muslin.

I hope you enjoyed this peek - I'll come back and share the rest later.

Till then - happy fall!

Immi


Tuesday, October 14, 2014

Challenge: O is for...

This week's Simon Says Stamp Monday Challenge is to be inspired by the letter "O". I always enjoy seeing the different interpretations that the blog design team shows us to get things going.

I chose to let "O" represent the color orange. It's a nice fall color, although the card I made doesn't have an autumn feeling at all. Here it is:


This was a fun technique-driven card. I made the background using a stencil and Distress Ink. The sentiment panel was made by smudging various Distress Inks on an acrylic block that had gridlines on it. After applying the inks, it was sprayed with water and pressed onto some watercolor paper. I really like the colorful background it created, and it was super easy. The sentiment was  stamped with Versafine black ink and layered onto the orange background. The card base is a light green cardstock.
This card went in a box for Operation Write Home.

I hope you can do something fun and creative today!

Immi

Thursday, October 9, 2014

Challenge: Use Watercolors

This week's challenge from the Wednesday Simon Says Stamp blog is to use watercolors. There are so many options available, including inks, pencils, crayons or traditional watercolors, just to name a few. I thought I'd submit a card I did while practicing making a background using watercolor pencils. I got this idea from Watercolor for Cardmakers from Online Card Classes. It's a really fun class, and I can take my time working through the lessons without any deadlines.

Here's my card:


The technique involves lightly coloring a piece of watercolor paper with water soluble pencils. Then water is applied with a brush, blending as you go. It's possible to go back after drying to add additional layering and depth. The splotches add some interest and fun. I cut the watercolor panel slightly smaller than the card base and attached it to a turquoise cardstock panel.

The "hello" is one of the few word die cuts I have - I'd like to add to my collection as there are so many available in lots of fun fonts. I cut several from white cardstock and glued them together to make it thicker so it would stand out more from the card. You can see the slight shadow created by the depth of the letters.

There really isn't much to this card, but I like the way it turned out. I also like that every card would be a little different, since watercolor never turns out the same way twice.

Happy creating,

Immi

Saturday, October 4, 2014

More Apron Obsession

I have continued having some fun making aprons, and learning new things in the process. I still have several apron patterns I'd like to try!

This first apron illustrates how things often go for me. I was at the fabric store, looking for bias tape for a half-apron, and came across the cutest fabric AND it was on clearance! The clearance dot was ringed in red, so I checked the chart, and was super excited to see that it was 90% off! Wow! Of course, at that price, I had to go for it! I checked the yardage requirements of one of my patterns, and went to the counter to get the required amount. After the employee had cut it, she told me the price per yard, which was higher than I thought it should be. I'm not great at math, but I knew that what she was quoting me was not 90% off. I questioned her, and she told me that the red ring was to highlight that the dot was white, which made the fabric 50% off. Bummer! I decided to go ahead and get it anyway, but I was disappointed. Typical Immi trick, though! Here's the apron:


I realized when I was ready for the finishing touches that I had never made a buttonhole with this particular sewing machine. I discovered that it is not at all intuitive, and it took lots of trial and error on some scraps before getting it right. I finally succeeded and I'm quite happy with the way it turned out. It has a single button at the top of the back and also ties around the waist in the back. The bottom front is divided into three pockets.

This next apron I made is from some fabric I had purchased quite a while ago - I can't remember what I had intended to do with it, but while I was on a roll, I went with a half apron. I don't even wear half aprons much, but I was having too much fun to quit. If I were to do this one again, I think I'd rather cut the pockets a little larger so that I could hem them rather than using the bias tape as the pattern directed. I really think this fabric is cute, and I enjoyed making such a simple project!


Now go out and do something creative!

Immi

Friday, October 3, 2014

Aprons, True Confessions, and a Thank You

I've been on a bit of a sewing kick lately. One of the flaws in my character is that I tend to flit from one thing to another. I dabble in lots of things and master none of them. Anyway, back to the sewing kick. I've meant for years to make myself some new aprons. I love all the resurgence in interest in vintage apron patterns and fabrics that is so popular now. Aprons are so utilitarian, but women have found ways to make them beautiful, too.

Here's one I made that was as cute as a button, but did not fit me at all.


I should have known! I have avoided boat neck tops for years because they do not flatter me. The large scooped yoke on this ended up being way to big for my narrow shoulders. An off-the-shoulder apron might be sexy, but would be such an annoyance in the middle of a busy working kitchen! Too bad, because I really liked the pattern and the fabric. My consolations are that I learned some things from making it, and I already had the fabric and the pattern at hand. (Here's where the True Confessions part comes in - I've had this fabric for YEARS and I Bought It With No Clear Idea What To Do With It!! Is it a character flaw to buy fabric just because???) *Note: my mom has suggested that I try some darts for a better fit - maybe I can still rescue this.


One of my favorite aprons is one that my mother made for me many years ago. It's a smock-style apron, and I have worn that thing to smithereens! I love it because it's quick and easy to put on - no fooling with ties or bows. Just a few quick snaps and I'm good to go. As you can see, it's really time for it to go to the rag bag - it's not even decent enough for Goodwill!


Old Favorite
All Worn Out!

I looked for a long time for a replacement pattern, but couldn't find what I wanted in the fabric stores. I finally stumbled on it in a newspaper and ordered it. Exactly what I wanted! I used another length of some "just because" fabric to make my new one.

Brand Spanking New!
I'm happy with the way it turned out. I did have to go to the store to buy some bias tape and the snaps. I had never worked with this type of snap fastener before, and messed up the first one. I got the hang of it though, so another lesson learned! I bid the old apron a fond farewell, and the new one is hanging in the pantry ready to go. Thanks, Mom, for a great gift! You probably had no idea how much use I would get from it, nor how much comfort I had as it became an old friend!

Till next time,

Immi

Wednesday, September 17, 2014

Simon Says Stamp Flickr Group Challenge

I recently learned about a Flickr group designed to showcase what others are doing with Simon Says Stamp products. I have a few of their stamp sets, so I thought it would be fun to participate. The group has just started posting regular challenges as prompts for members to use.

The first prompt is a color scheme. The instructions state that at least three of the five colors should be used. When I first looked at it, I really had no idea what to do with those colors. These are not colors I would typically work with, but that's part of the challenge.


Color Challenge Inspiration by Simon.Says.Stamp

I pulled out my SSS stamps hoping inspiration would strike. Nothing. So, I followed the advice of a well-known and very savvy stamper, Jennifer McGuire. I did a Google search on the name of one of my sets and looked at images of what others had done with this particular set. I was struck by this card:

Simon Says Stamp Wednesday Challenge: Anything Goes, Memory Box | shurkus.com

I liked the white text on a gray panel against the bright yellow on the background. Using someone else's work as inspiration (in the cardmaking world) is known as CASE. Sometimes this is known as Copy And Steal Everything, but some prefer Copy And Share Everything (I'd rather think of it that way, too!). As Solomon said, there is nothing new under the sun!

Here's my card:


I started my card with a piece of watercolor paper. For the green in the color sample, I chose to use an old jar of Lumiere paint. This paint is old and has become quite thick, but it worked beautifully to spread through some stencil waste to create the green dots in the background. I did this in a random way to create interest, color and texture. After that dried, I painted over the panel with various shades of yellow watercolor and let that dry. 

Just as my inspirational stamper did, I white embossed the sentiment on white cardstock. I colored over it with Pumice Stone distress ink, using a blending tool. I dripped some water over that and let the water react with the ink. Distress ink is great for this technique! I mounted this panel onto some black cardstock and sewed around the edges with black thread. 

After trimming the edges of my watercolor paper, I used plenty of adhesive to tape it to a black cardstock base. The sentiment panel went on top of that using 3m foam tape for a little extra dimension. As a final touch, I glued down a bright orange butterfly punched from some thick textured cardstock - the same cardstock I mentioned here.

I love the finished result. This is such a sweet saying, and it means even more to me because my daughter sings this to her children. They love it, and I love hearing her sing it to them. I have enjoyed singing it myself on the occasions when I've had the opportunity to put them to bed. Makes me want to dash down there for a visit!!

Till next time,

Immi