Showing posts with label Heat Embossing. Show all posts

Saturday, March 19, 2016

Birthday Card

Sometimes I like to challenge myself to pull out something that doesn't get much use and have fun with it. Occasionally I do clean out products that I don't think I'll ever use again, but this was a flower stamp (Stampendous Fresh Bloom) I really do like. It's an outline stamp that would be pretty colored in, but I decided to make a colorful background and keep the flower simple.

With white cardstock as my base, I stamped the flower with Versamark ink, and heat embossed with clear powder. Using a foam blending tool, I blended several cheerful Distress ink colors on top. In addition to great blending, one of the cool things about Distress inks is the way they react with water. It's fun and unpredictable! So...after blending, I spritzed the paper with water. After waiting a few seconds, I blotted the water off, and was left with bleached-out areas. The embossed flowers preserved the white and stood out nicely against the colorful background.

The sentiment if from Altenew's Label love - stamped in Versafine Onyx Black and heat embossed with clear embossing powder. I trimmed closely around the sentiment and mounted it on top of the stamped panel. To add a little more pizazz, I glued on a few sequins using Ranger's Matte Medium. I mounted the panel on top of some coordinatingl cardstock, and adhered the whole thing onto a white card base.


Sunday, January 17, 2016

Make A Wish

I can't believe how long it's been since I put up a blog post - I've really neglected my poor blog! I thought I'd try to get back into the swing of things with a very simple card today. I apologize for the less-than-stellar photograph. I've got to figure out what's wrong with my camera, but until then I'm using my phone's camera.


This is a very easy technique I learned from a blog post by Jennifer McGuire. I stamped the background with Simon Says Stamp Audrey Blue ink, using the Hero Arts Everything Flowers background stamp. Once that had a minute to dry, I used a Ranger blending tool and Hero Arts Unicorn pigment ink. I blended the ink over the center of the stamped image, to lighten it and make it recede a little. The edges are left the original blue color.

This allows the sentiment to stand out more - I used a stamp from Altenew Super Script 2, stamping in Versafine Onyx Black and embossing with clear embossing powder.

I trimmed the stamped panel slightly and mounted it onto a turquoise card base.

Fun, and easy!

Happy crafting - 

Immi

Friday, September 11, 2015

Thank You Card

It's always good to have some thank you cards on hand - I already know who is going to get this one. This is the last of three cards I made inspired by the current Unity Stamp challenge. To see the other posts, click here and here.

Now on to today's card:


I used a couple of sets from Unity for this card - Donna Poppies and Butterflies & Sunbeams. I wanted to do a resist technique for this card, so I stamped the poppy with Versamark ink on a manila shipping tag, allowing the image to hang off the edge. (I think it adds some interest that way.) Versamark is a clear, sticky ink that is wonderful for heat embossing. I poured clear embossing powder over the image and set it with a heat tool. I chose a couple of colors of Distress Inks - Bundled Sage & Rusty Hinge, using blending tools to cover the surface of the tag. The area that was stamped & embossed resists the color, allowing the base color of the tag to show through - pretty cool!

Next I dabbed some Distress Stain in Peeled Paint on my craft sheet and pressed the surface of the tag into the wet color. This creates the darker areas of green. I really like the uneven, splotchy look I got. Once it was dry, I got out an iron I keep just for craft techniques and ironed the back of the tag with scratch paper under the front. The scratch paper soaks up the embossing powder as the iron melts it. This leaves the original tag color showing, but the surface is smooth rather than raised as it would be if I left the embossing alone. It almost looks like batik, and I guess it's the same principle. The sentiment was stamped with Making Memories Artprint Brown and embossed with clear powder.

I used two colors of twine that coordinated with my palette to tie a bow through the hole in the top of the tag. The papers underneath all got some Distress Ink treatment to darken the edges, and everything is mounted on a cream colored card base.

Here is the challenge image from the Unity blog:


I enjoyed this challenge a lot, and had fun working with these colors.

Hope your week is going well,

Immi

Monday, June 8, 2015

Take a Technique: Texture

I made this card a while back, and thought it would be a good fit for the latest Take It Make It challenge from Craft Stamper. The challenge this month is to use texture. This card has rough and smooth texture because of the papers I used.

Here's my card:


I started with a piece of watercolor paper which has a rough side and a smoother side. I chose the rough side. I inked up the Measured stencil by Tim Holtz with several mini Distress ink pads. Then after spritzing the stencil with water, I pressed the inked side down onto the paper and let it absorb for a minute. If you look closely at the lower left corner of the panel, you can see one of the numbers fairly clearly.

Next, with black Archival ink, I used the butterfly stamp from Stamper's Anonymous Papillon and stamped over the (dry) Distress inked background. I layered this panel onto some black cardstock, leaving just a thin edge showing.

Next I chose a patterned vellum (here's my smooth texture) and layered it over orange cardstock. I stitched the two together around the edges (more texture from the stitching). After taping this to the card front, I taped down my watercolored panel.

Finally, I stamped a tiny sentiment (Thanks Script by A Muse ArtStamps) with Versafine black and heat embossed it with clear embossing powder (nice raised texture). I cut a notch in one end of the panel and layered it onto black cardstock, again leaving a thin edge showing. I mounted this to the card front with some foam squares, which give some additional depth and interest.

Hope you enjoyed today's project!

Immi

Saturday, June 6, 2015

Ombre is Hot!

Now that summer "vacay" has started, I'm enjoying more time in my studio again. I'm hoping to participate in some challenges this summer, so I'm starting off with the latest challenge on Virgina's View Challenge blog. The challenge is to include an ombre color scheme or monochromatic color scheme or both.

Ombre is hot, hot, hot right now - and lots of fun, too. Recently, Hero Arts released some ombre ink pads, and I was able to pick up a couple at my local Hobby Lobby. (Of course, I always use a 40% coupon - so nice that I can pull it up on my phone!)

Here's my card:

I started with a 4.5" x 5.25" piece of white cardstock and Hero Arts Canvas background stamp. I inked the stamp with Hero Arts Butter to Orange Ombre Ink Pad, following the advice of Jennifer McGuire to get a good blend. The color change is subtle, but pretty.

Next I cut another piece of white cardstock with the largest tag from Sizzix Alterations Tag Collection Framelits die set. Using an ink blending tool and one of my good old Stampin' Up! ink pads - Barely Banana, I colored the tag. Next I used a new-to-me stamp set (bought on clearance at Hobby Lobby!) - also by Alterations - French Flight. (Although I didn't make use of it on this card, this stamp set comes with the matching dies.) I inked the butterfly stamp with Ripe Persimmon Distress ink, stamped it and heat set it. I used some Spiced Marmalade Distress ink on the very edges of the tag and the canvas stamped panel. I also cut the same tag shape from a scrap of textured orange cardstock.

To assemble everything, I attached the canvas panel to my last piece of Barely Banana cardstock. I layered the two tags and adhered them towards the left side of the card front. I made a double loop bow from some thin American Crafts twine in orange and glued it to the top of the tag with Multi Medium Matte by Ranger. I stamped the greeting from Altenew's Hennah Elements with black Versafine ink on a scrap piece of white cardstock I'd colored with Ripe Persimmon ink. I covered the sentiment with clear embossing powder and heat set it, then using some tiny pieces of foam tape I attached it towards the bottom right. A few Doodlebug & Studio Calico sequins were glued down with the same matte medium.

It sounds like a lot of steps, but really went together fairly quickly. I probably spent more time agonizing over where the sequins should go than I did on anything else! Some card artists make it look so easy, but it's not intuitive for me at all. 

Hope your summer is off to a good start!

Immi


Wednesday, March 4, 2015

Dot Flower Background

Here's the second card I made today (to see the first, click here).


This card uses the same background stamp - Hero Arts Dot Flower. This time, I stamped with Versamark on white cardstock and embossed with white powder. Then, I used Barn Door, Ripe Persimmon, and Wild Honey Distress inks, applied with blending tools. The embossing resists the ink and stays white - I really like this look! (Here is a link to the image that inspired me.) This was adhered to a white cardstock base.

Next I cut a couple of tags using Tag Collection dies from Alterations. I edged them with some Distress Ink in Peacock Feathers. I also used a couple of vellum die cuts from the Spring Greenery die from Alterations. The blue flourish behind the tags is cut from glitter paper from Die Cuts With a View, using a file that I downloaded to cut with my Silhouette Cameo.

The sentiment is from a small set (I don't remember the name), and is stamped with Versafine Black Onyx and embossed with clear powder. 

The glitter flourish and tag were glued down to the background with dots of Glossy Adhesive. (Before gluing the tag down, I tied a little bit of twine through the hole at the top.) I used a little Matte Medium from Ranger to attach the vellum leaves just at the base of the stem, and also used the same medium to glue down some colorful sequins. Everything was then weighted down under a book for a little while to be sure it dried in place.

I'm linking this card up with the Hero Arts Nature Challenge, the Simon Says Stamp Girly Challenge, and Virginia Lu's All Things Embossed.

Hope your week is going well!
Immi

Friday, February 27, 2015

Celebration Card

I'm participating in the Muse Challenge #106 this week.


I tried some new (to me) products on this card. The stamp set I used is from Mama Elephant and is called Make a Wish. I stamped my sentiment with Versamark ink and embossed with Liquid Platinum by Ranger. The stars are from the same set, and I tried a couple of newly purchased inks: Simon Says Stamp's Audrey Blue and Hero Arts' Fresh Peach.

The multicolored strip is cut from the Mama Elephant packaging. The colors seemed just right to use with this card. This is a very basic, simple card and it was a great opportunity to test drive some new things. I think this card will end up in a box sent to Operation Write Home.

Here is the inspiration image from the Muse blog:


As you can see, I borrowed multiple elements from this card. The simple panel to the left with all the stamping concentrated towards the bottom and also the stamping on the far right of the card front.

Happy crafting!

Immi

Tuesday, February 24, 2015

Friendship Card

I'm trying to squeeze more time in for art play in the evenings, and relying on challenges to give me ideas to try. Hero Arts currently has a challenge going with a nature theme. The only rule is to use at least one of their stamps. I decided to try a new stamp set I found on clearance at a local scrapbook store. (Somehow, if it's on clearance, I feel better about buying it!)


I started with a watercolor panel and inked it with two Distress Inks - Worn Lipstick and Wild Honey. I applied each color with a blending tool from the opposite edge, allowing them to blend together in the middle. I love the way the colors look together!

I stamped the floral design twice with Versamark ink and sprinkled it with Wow Opaque Bright White Super Fine embossing powder. (Since Distress ink stays wet longer than most dye inks, I was careful to heat set the blended ink in the background until it was completely dry. Otherwise, embossing powder would have stuck everywhere.) After heat setting the embossing powder, I stamped the butterfly from the same set (Hero Arts Butterflies & Wildflowers). This time I used Versafine Onyx Black and sprinkled clear embossing powder on top, heat setting afterwards.

The white embossing I'd done earlier really didn't look as good as I'd like in the middle of the stems. I decided to cover my boo-boo with a vellum strip. I used the Mini Scallop & Pinking die from Alterations to cut a scalloped edge on both sides of my strip. Then I stamped my sentiment from Hero Arts Friends, using Versafine Onyx Black. I used clear embossing powder again and heat set it. Since vellum is always tricky to adhere without seeing the adhesive through it, I chose to stitch it down with my sewing machine and white thread. I think this did a pretty good job of disguising my less-than-perfect stamping. I always try to find a way to salvage my work!

The watercolor panel was mounted onto a plain white card base and that was that! It was a fairly quick project and I'm happy with the way it looks.

Happy crafting!

Immi

Monday, November 24, 2014

Christmas Tag Card

Although I usually don't make my own Christmas cards, it's easy to find inspiration this time of year. I have some new stamps that I won in a drawing (Winter Wonderland by Winnie & Walter) and wanted to try them out:


I started with a plain manila tag, colored with Broken China distress ink and a blending tool. I inked the tree stamp with Peeled Paint Distress Ink and spritzed it lightly with water before stamping over my blue background. After heat setting, I mixed up a little white acrylic paint with water and flicked it over the tag with a paintbrush to create a snowy effect. 

The stag was stamped with Ranger's Potting Soil Archival Ink and coated with clear embossing powder while wet. After heat setting, I poured on additional embossing powder and heat set it again for a nice, smooth look.

I wanted to layer some papers behind the tag, so I chose a red plaid and cut it into a tag shape. The white paper with green dots is a Project Life journal tag which came printed with grid lines. I stamped the dots using Penny Black's Dots in Space stamp and Peeled Paint ink, then cut it into a tag shape. After punching holes in my homemade tags, I tied them behind my stamped tag using some dark red sheer ribbon.

The white panel behind the tags started as plain white cardstock. I used Ranger's Texture Paste through a Prima chevron stencil, then sprinkled some iridescent embossing powder over that. I let it sit for a few minutes and then heat set it.

The sentiment is inked with Potting Soil and embossed with clear powder. I colored the white cardstock with Aged Mahogany Distress Ink and a blending tool, and cut the banner shape by hand.

Everything was adhered to a dark brown cardstock base, cut to be a top folding card.

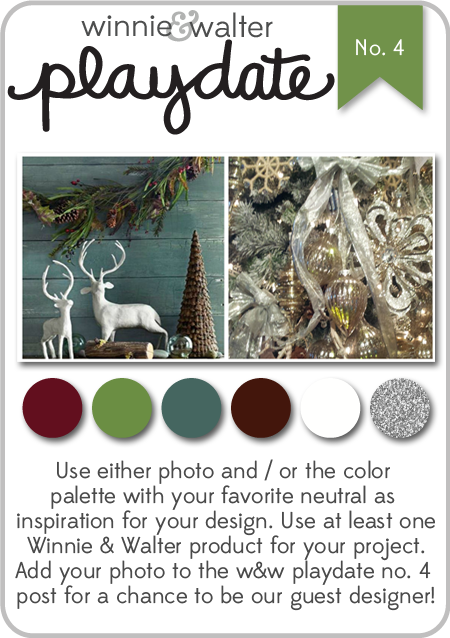
I'm linking this card up to two challenges: Winnie & Walter Playdate #4 and Muse Challenge #95. I pulled inspiration from both of these challenges to make my card. My colors I chose from the Winnie & Walter image:

w&w_playdate4_oct2014
Winnie & Walter Playdate #4

The idea of layered tags came from the Muse image:

Muse Challenge #95

I hope you have a great time this week, enjoying Thanksgiving with family and friends!

Immi

Wednesday, November 12, 2014

Getting in the Holiday Mood

I have a couple of projects to share for this week's Monday challenge from Simon Says Stamp.

First is a card I made, inspired by this card.


I started with a kraft cardstock panel. I stamped the sentiment first to be sure that the snowflakes would fit around it. I combined snowflakes from multiple sets (Stampin' Up! and Inkadinkado) so that each one would be different. I used a silver pigment ink and covered that with silver embossing powder. After heat setting, I wanted to use some kind of thread or ribbon to make the snowflakes look like hanging ornaments. I remembered that I had some thin silver cord, so I tried that. I put down tiny dots of Glossy Accents to hold the ornament strings in place, then tied teeny little bows and glued them above each snowflake. I put a heavy book on top until everything dried. Then I wrapped the cord to the back of the panel and taped it down. The stamped panel was mounted onto a navy card base. I was surprised how quickly this came together. In retrospect, though, I don't know if I'd use the silver with kraft again. I'm not sure there's enough contrast. Live and learn, I guess.

Next is an ornament:


To make this, I cut a scalloped circle from watercolor paper using a die set from Spellbinders. The stamp I used is an old one from Stampin' Up! that I've had for many years. I used Versafine Black Onyx ink and embossed it with clear embossing powder. To color the image, I used Distress Inks diluted with water and some Stampin' Up! markers in a few spots.

I cut three more scallops and glued them all together, using a book to weight it down until dry. I decided to run a Versamark marker around the edges and dip them in silver embossing powder. I really like the way that turned out. Then I used a bookbinding tool to punch a small hole in the top and used some of that thin silver cord to make a hanging loop.

That's it for now. I hope your week is going well!

Immi


Tuesday, November 11, 2014

Take It, Make It Challenge : November

The November Make It Take It challenge from Craft Stamper Magazine just about had me stumped. The challenge is to use non-Christmas themed stamps to create a Christmas or holiday card. I enjoyed seeing the examples from the Design Team, but I was drawing a complete blank. And then...it came to me! Alphabet stamps in the shape of a tree! Now I was getting excited to see if I could make it work.


I knew I would need to use a clear stamp set so that I could see exactly where each stamp was being placed. I pulled out Typewriter Alphabet by Stampendous which I thought would be about the right size. I tried at first to stamp each letter individually, but I quickly saw that it would be very uneven and messy looking. I decided I would use a stamp press, and tried laying the stamps out on a piece of paper but they kept getting bumped out of position. (Insert sounds of frustration.)

I finally figured out that I needed to arrange them directly on the stamp press so that they would stay put until I had them all in position. Ahh! That's much better! I stamped them on my paper and then used some low tack tape to mask off a triangle around the "tree". I heat set it to be sure it was dry and began blending some Distress Ink in Evergreen Bough over the letters. To my dismay, the letters began smudging. Blech!

So, determined to make it happen, I turned the paper over and taped off my triangle area again. I blended the Distress Ink over it and decided to flick a little water over the surface to create some lighter spots. After drying the paper, I inked up the letters again and stamped - much better this time!

Next I took a small stamp that looks like an asterisk and stamped in Stampin' Up! Real Red randomly over the tree. I cut it out and brushed the edges with some more Evergreen Bough and a little Vintage Photo.

Next up, the background. I took another sheet of paper - by  the way, I used Strathmore Bristol for this project - and inked the entire thing with Tumbled Glass Distress Ink. After heat setting, I used the little asterisk along with a couple of others to stamp "snowflakes" with Versamark. I poured some sparkly embossing powder over them and heat set again. It's hard to see in the photo, but the snowflakes have some nice sparkle to them.

I cut a scrap of white to make a hill for the bottom of the card, along with a scrap of brown for a tree trunk. I stitched the hill down and used adhesive for the tree and trunk. I had a little silver star in my stash that I glued above the tree with Glossy Accents so it won't budge.

Finally, I colored some scrap white cardstock with Festive Berries Distress Ink and stamped the sentiment which is from a new set called Winter Wonderland from Walter & Winnie. The sentiment comes as a single line, but since it's a clear stamp I was able to cut it apart and stamp it as a two-line sentiment. That fit my card better. I cut the strip of paper in a banner shape and adhered it down to the background panel. The entire panel was then adhered to a top-folding white card.

I'm happy that I was finally able to come up with something for this month's challenge. Hope you enjoyed  it!

Immi

Thursday, November 6, 2014

Simon Says Stamp Flickr Challenge #5

I had some time this week to see what was going on with the Simon Says Stamp Flickr group. The current challenge is to use embossing - something that's lots of fun. I used two types of embossing on this card - dry embossing with a folder and heat embossing. The main rule with this group is that all projects must incorporate products designed by Simon Says Stamp. I have a few of their sets, so I got busy.


I started with a white cardstock panel that I'd used to practice blending Distress inks. Hopefully you can see that the color moves from dark to light. That was done by blending three colors of Distress inks (Faded Jeans, Broken China, and Tumbled Glass) using the Distress blending tool. It took some time and more than one application, but I finally got a nice smooth transition. I ran that through my Big Shot with the Distressed Frame embossing folder by Sizzix. Then I added some Pumice Stone and Peacock Feather Distress inks around the edges to bring out the raised, embossed area.

Peeking out from behind the heart is a white rub-on from Me & My Big Ideas. It was a bit of a bear to get rubbed on properly, but I finally managed.

The heart is from SSS Music 2 My Ears. I stamped with Versafine Black Onyx and embossed with clear embossing powder. I used some Dried Marigold Distress ink around the edges, and added foam tape to the back.

The flowered paper is from a 6 x 6 pad called Vintage Bliss Paper by Simple Stories. I cut a small strip and stitched it down to the blue panel. 

The gray banner at the bottom was originally a white strip of paper that I colored by pressing Simon Says Stamp Fog ink onto it. I stamped the sentiment, pulling stamps from a couple of SSS sets - Big You and Hello, You. I darkened the edge with Faded Jeans and added three crystal gems.

Finally I was ready to pull everything together. I wrapped some peach silk ribbon a couple of times around my hand to form loops, and taped that down to the blue panel. The heart was placed on top and the gray banner at the bottom. The completed blue panel was adhered to a white card base.

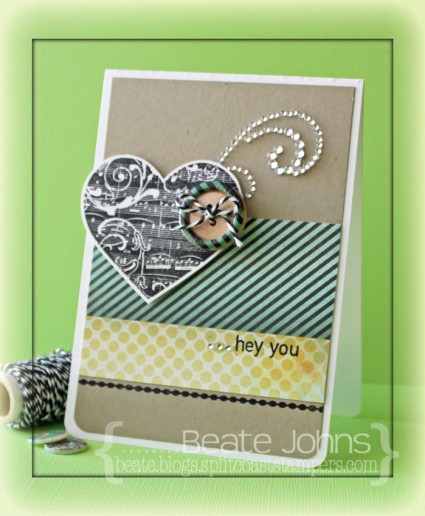
Sometimes when I look at a stamp set I have no idea what to do with it - I just draw a blank. That was the case with the Music 2 My Ears set. I wanted to use it, but nothing was coming to me. I did a Google image search and found a lovely card that got me going. Here it is:

Inspiration Image

If you'd like to see the original post, please click on the photo's caption. It should take you there.

Happy crafting!

Immi


Wednesday, November 5, 2014

Muse Challenge #92

Hello and Happy Wednesday to you! I'm participating in another challenge today from Muse. Here's my interpretation:


I was inspired by several things in the inspiration image (see below): the blue & green dots, the flowers, and the vellum sentiment strip.

For my card, I chose a flower stamp from Hero Arts. I used Hero Arts black ink and stamped several times on textured white paper. The paper is actually the back side of the cover to a pad of el cheapo watercolor paper. I used some of my trusty Stampin' Up! markers to color in parts of the flowers. The blue dots were made with another Hero Arts stamp and Brilliance Sky Blue ink.

I trimmed this panel down and added a thin strip of green cardstock to the right hand side, then set it aside while I worked on the sentiment strip.

I cut a piece of vellum and used Versafine Black to stamp the sentiment from Altenew. I really like the larger sentiments that are available these days and would like to add more of them to my collection. After stamping, I heat set it and then stamped again in Versamark. I poured clear embossing powder over that and heat set again. I was interested to see that the Versamark lightened the black ink so that my sentiment was now stamped in gray. That's not what I had intended, but I went with it anyway.

I wrapped the vellum strip around my flower stamped panel and taped it down to the back. Then I adhered the panel to a dark pink card base.


Here's the inspiration card:

Muse #92

Thanks for reading - I hope you enjoyed this! Till next time,

Immi


Monday, October 27, 2014

Challenge: Get Crafty & Use Kraft

Here is my submission to the Wednesday Simon Says Stamp challenge - Get Crafty & Use Kraft. I love the look of kraft cardstock so this was a fun challenge.


I used one of my favorite flower stamps from Stampendous, stamping in Versamark and heat embossing with white. I colored in the flowers using Inktense pencils and a wet brush, which went very quickly. The embossing makes it easy to "stay in the lines".

The sentiment is from Altnew's Super Script 2. I stamped in black ink and trimmed it closely. I brushed on clear Wink of Stella and added Glossy Accents on top, then set it aside to dry. 

Meanwhile, I cut a piece of lace edging and taped it down to the back of the kraft panel. I stitched around the entire panel using my sewing machine, then adhered a thin strip of green ribbon at the bottom. This panel was attached to a pink card base, then the sentiment was glued on top of that.

I hope your week is off to a good start! Happy crafting!
Immi


Wednesday, September 17, 2014

Simon Says Stamp Flickr Group Challenge

I recently learned about a Flickr group designed to showcase what others are doing with Simon Says Stamp products. I have a few of their stamp sets, so I thought it would be fun to participate. The group has just started posting regular challenges as prompts for members to use.

The first prompt is a color scheme. The instructions state that at least three of the five colors should be used. When I first looked at it, I really had no idea what to do with those colors. These are not colors I would typically work with, but that's part of the challenge.


Color Challenge Inspiration by Simon.Says.Stamp

I pulled out my SSS stamps hoping inspiration would strike. Nothing. So, I followed the advice of a well-known and very savvy stamper, Jennifer McGuire. I did a Google search on the name of one of my sets and looked at images of what others had done with this particular set. I was struck by this card:

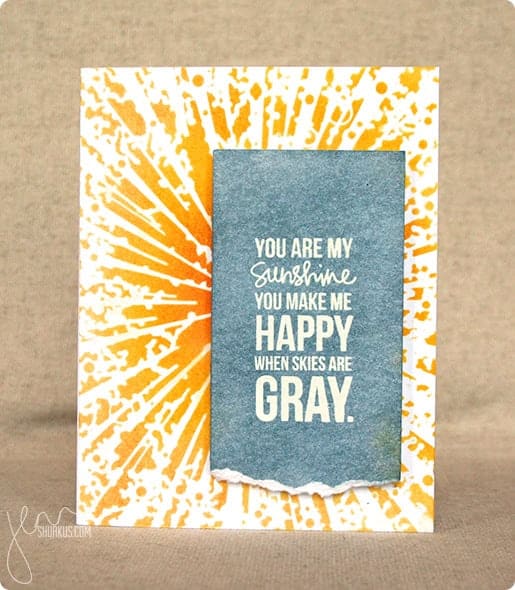
Simon Says Stamp Wednesday Challenge: Anything Goes, Memory Box | shurkus.com

I liked the white text on a gray panel against the bright yellow on the background. Using someone else's work as inspiration (in the cardmaking world) is known as CASE. Sometimes this is known as Copy And Steal Everything, but some prefer Copy And Share Everything (I'd rather think of it that way, too!). As Solomon said, there is nothing new under the sun!

Here's my card:


I started my card with a piece of watercolor paper. For the green in the color sample, I chose to use an old jar of Lumiere paint. This paint is old and has become quite thick, but it worked beautifully to spread through some stencil waste to create the green dots in the background. I did this in a random way to create interest, color and texture. After that dried, I painted over the panel with various shades of yellow watercolor and let that dry. 

Just as my inspirational stamper did, I white embossed the sentiment on white cardstock. I colored over it with Pumice Stone distress ink, using a blending tool. I dripped some water over that and let the water react with the ink. Distress ink is great for this technique! I mounted this panel onto some black cardstock and sewed around the edges with black thread. 

After trimming the edges of my watercolor paper, I used plenty of adhesive to tape it to a black cardstock base. The sentiment panel went on top of that using 3m foam tape for a little extra dimension. As a final touch, I glued down a bright orange butterfly punched from some thick textured cardstock - the same cardstock I mentioned here.

I love the finished result. This is such a sweet saying, and it means even more to me because my daughter sings this to her children. They love it, and I love hearing her sing it to them. I have enjoyed singing it myself on the occasions when I've had the opportunity to put them to bed. Makes me want to dash down there for a visit!!

Till next time,

Immi


Tuesday, July 1, 2014

Challenge: W is for White!

This week, Simon Says Stamp issued a challenge to use the color white. I thought it would be interesting to stamp and emboss in white on kraft colored cardstock. Here's how it turned out:


Kraft cardstock is great because it lends itself to any color combination you like. It can have a masculine or feminine feel, depending on what you do with it. I chose to use a flower flourish stamp with rather bold lines. I stamped with Ranger's white pigment ink, and heat embossed with white powder. I've learned the hard way that it's worth it to take the time to prep the paper before stamping or adding the embossing powder. Otherwise, little specks of embossing powder end  up where you don't want them and it's a pain to try to brush them off! I use a powder applicator by EK Success, but any brand will do.I stamped the sentiment on a separate piece of paper using ColorBox Warm Red chalk ink, and heat embossed that with a red powder. I ran some red ink along the edges after notching the ends. I trimmed the kraft piece down to fit on a white speckled card base, allowing the white to serve as a frame.

This was a quick and easy project, and I'm happy with the way it turned out. I hope the recipient likes it!

Immi

Thursday, May 22, 2014

Cure for the Monday Blues Challenge #18

I'm back with my take on the challenge issued this past Monday based on this image:


I drew inspiration from the dots on the pegboard, the colors orange and turquoise, and the black circle with white text on the jar. There is a lot to look at here, so I needed to whittle it down a little bit! Here's what I did:


I used a white card base, adding some orange textured paper as my background. I was excited to find some black dotted tape in my stash, which seemed like the perfect nod to the dots on the pegboard in the photo. I used a small alphabet stamp set to stamp the word "hello" in Ranger's white pigment ink on some black cardstock. I embossed the letters with white embossing powder. (I was careful to brush powder with my EK Success Powder Tool to keep the embossing powder from sticking all over the paper - just to my stamped letters.) After stamping and heat embossing, I used a circle punch to get that perfect circle. Believe me, there's no way I can cut anything as nice as a punch can do in no time! 

After mounting the circle on the card front, I wanted to include a little of the turquoise (seen in the stack of washi tape in the original photo). I pulled out some tiny buttons I have, and used three - groups of odd numbers are more pleasing to the eye than even numbers. I attached the buttons with Glossy Accents, which holds so well.

This is much more clean cut and graphic than what I usually do, but I enjoyed the challenge.

Happy crafting!

Immi