Showing posts with label Colorbok. Show all posts

Friday, July 10, 2015

Quick Cards

Hi, all. I've got a couple of quick cards today, both using Unity stamps. Unity is a cool company in Minnesota that produces high quality red rubber stamps. The stamps come unmounted, but attach easily to an acrylic stamp block. The prices are fantastic, and they have designs for all styles.


I stamped the image on watercolor paper and used a combination of Stampin' Up! markers with a wet brush to do the coloring. I also splattered some ink just for fun and added a strip of washi tape across the bottom. 

Next I chose some 6x6 patterned papers from American Crafts and Colorbok to layer behind the watercolored panel. After taping everything down, I added a few Studio Calico sequins for some additional color.


This card also features layers of paper along with simple marker + wet brush watercolor. Although you can't see it in the photo, I also went over the flowers with a clear Wink of Stella marker, which creates a subtle sparkle. The centers of the flowers also got a touch of Glossy Accents.

The stamped panel was stitched to a paper I had in my stash which makes me think of a garden trellis - kind of nice as a background for flowers. I also added the black strip at the side - I never get tired of seeing how black makes other colors pop! The orange paper in the back was chosen to coordinate with the color of the flowers. (I don't remember who makes either of those patterned papers.)

Quick & easy!

Till next time,
Immi


Thursday, October 16, 2014

Unity Stamp Challenge

I have recently been experimenting with some of the stamps from Unity Stamp Company. Their stamps are all made in Minnesota. The prices on sale are really great, and shipping is quite reasonable. Each month, on their blog, a new challenge is posted. Participants have the choice of basing their inspiration on a sketch and/or a color scheme.


I love the look of vintage ornaments, so the photo really caught my eye. I decided to try to incorporate the colors and the card sketch. Here's the result:


I started with an off-white cardstock that I colored with Distress Ink - Old Paper, using a blending tool. Then I inked up a background stamp - Thin Stripes from Impression Obsession, using Distress Ink in Spun Sugar. The pink panels are from a 6 x 6 paper pad by Colorbok that I found at Walmart. 

The sentiment is from Unity Stamp's October 2014 Sentiment Kit. I stamped it on a plain old manila shipping tag using Ranger's black Archival ink. The tag was colored with Distress Ink Peacock Feathers, with Vintage Photo around the edges. I spread a crackle medium over the entire tag and let it dry. I love the cool crackled effect!

The thread is some heavy cotton thread that I colored using Distress Inks in Picked Raspberry and Vintage Photo. I smooshed some ink on my craft sheet and spritzed it with water. Wearing a glove to prevent stained fingers, I rubbed the thread into the ink until it was colored, then dried it with a heat tool. I wrapped both colors around the bottom of the tag, and also made a bow at the top.

Till next time,

Immi

Tuesday, September 2, 2014

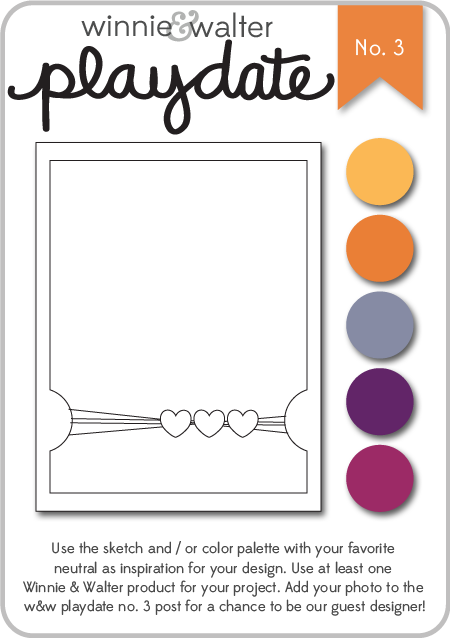
Winnie & Walter Playdate #3

I stumbled across this challenge this evening and decided to do my best to get a card ready to participate. Winnie & Walter is a fairly new stamp company. I've been seeing their stamps used on a variety of blogs I follow. I don't own any of their stamps yet, but they also offer digital files. I downloaded a file to cut on my Silhouette, and used the sketch provided to create my card.

w&w_playdate3_august2014

I chose to use the sketch along with some of the suggested colors. Here's my card:


I started with a kraft cardstock base. On top of that is a layer of an orange sunburst paper that I edged with Worn Lipstick Distress Ink. The purple layer is a scrap of cardstock I had that I coated with clear embossing paste, using a stencil from Jenni Bowlin. After that dried, I punched out the half circles, and used the Worn Lipstick again around the edges. The "hello" is the digital file I downloaded from Winnie & Walter. I opened the file on my Silhouette and discovered that I didn't know how to cut a png. I had to get on the web to do a little research, but found it was quite easy after all (sigh of relief). I cut it from a pink patterned paper from a Colorbok paper pack - Light Bright. That's also where I got the orange starburst paper. I wrapped some thin gold cord from my stash around the card, creating some loose loops. I glued the loops down with Glossy Accents, also using that to attach the flower and button. For the "hello", I used teeny tiny drops of Glossy Accents to be sure it would stick to the embossed paper beneath. Finally, I used some Scotch 3M Mounting tape to attach the purple panel to the cardfront. This gives it a little extra height which is kind of cool.

I don't know why I create these situations for myself, but I was bound and determined to submit this - the deadline is later tonight. I'm happy with my result and I guess that's what counts the most!

Till next time,

Immi